Banner

Friday, 31 August 2012

Quick and easy creative ideas for toddlers - Stained glass

If you, like me, have children and doors in your house with glass panels in them, then you'll know what I mean when I talk about smeary finger prints.  I apologise, but I can't remember which blog inspired me with this one, but it's a great easy idea to add colour and art to your doors, and to take away the emphasis from the smeary fingers!
What you need:
tissue paper cut up into squares
sticky backed plastic (I think other parts of the world call it "contact paper"


Cut your sticky backed plastic to size for your windows.  Carefully lay it on the table in front of your children - encouraging them to be careful not to get it folded up.
Show the children how to stick the tissue paper just by laying it on.  You can join in too (mine's the one with the border!).  Don't cover up the whole piece of sticky backed plastic, otherwise there's none left to stick to the window.  When your child has finished their creation, stick it to one of your door panels and you have a beautiful door decoration.  

You can also adapt to include pressed flowers or autumn leaves (we'll be giving those a try once we've bought some more sticky-backed plastic!)

Thursday, 30 August 2012

Completed project! Bean bag

 If pride is a sin, then I'll admit to feeling particularly sinful today.  I finished something that has taken me a long time to get around to.  

Here's the background.  Before Bug was born we already knew that C was going to be moving out of the cot in the small bedroom close to ours on the ground floor, and into a big boy bed in his own big boy bedroom upstairs.  I wanted to make it really nice for him and planned to make a special bean-bag seat, a duvet cover and a pair of curtains, all with really cool cars on.  I found some lovely fabric - Traffic Jam, from www.kidsfabrics.co.uk, but at £9.50 per metre I couldn't afford too much of it, so bought three metres, and bought some apple coloured polycotton sheeting to use as a base fabric, with the transport fabric as panels.  Things were going brilliantly - then Bug put in an early appearance.  The fabric has been sitting, abandoned in a neat pile in the spare bedroom for the last eighteen months.  This week I finally got around to completing at least one part of the project!

I won't include the instructions here, because I got them from www.alternative-windows.com and they are very clear on the website.  So anyway, here's the finished article and I am very proud of it, and as you can see, C is pleased too! 


Tuesday, 28 August 2012

Quick and easy activity for toddlers - painting pebbles


Okay, so I know that you're not supposed to remove any rocks, pebbles or sand from the beach because of erosion and so on, but I'll admit that we liberated six or seven large pebbles from the beach when we were away in the caravan last week.


Painting pebbles makes a great quick and easy activity for toddlers, and the result will brighten up any garden.  You can either use water based paints (most children's paints) which will then wash off in the rain at some point, or you can use acrylics which will make more mess on your toddler, but will last longer outside.  I'm aiming to use water-based until they come up with a design that they are particularly proud of and then we'll paint over that one with acrylic in the future.

Monday, 27 August 2012

Practising new skills

When small children develop new skills they like to practise them - a lot!

Yesterday, after C showed some interest in a lever-arch file, Hubby showed him how it worked and then let him have one for his desk.  He delightedly ran off to his bedroom with it and spent most of the next hour carefully opening and closing it, and inserting and removing paper - one piece at a time.

With Bug, she has two current development skills to work on.  The first is her speech.  She points to anything that she knows the name of, and shouts out the name.  At mealtimes we are informed that this is her "plate", "spoon", "fork" and "dink" (drink).  The other skill which she is practising is dressing and undressing.  Go in to her bedroom in the morning and her pyjamas are in various orientations - pyjama trousers off, and the top, well she might have got her head out but arms still in, or arms out and head still in, or she might have managed to get it all the way off.  She loves pants (I'm in the UK so these are underwear).  If she's in C's bedroom she'll quite often go into his wardrobe and fetch a pair of his pants to put on.  We tried her in her own pants last week, but I don't think we're quite ready yet.  Today as I was ironing, she was taking items out of the ironing pile and putting them on... so she had a vest and t-shirt, then a pyjama top, and then a dress over the top.  Then she went and fetched a hat and some shoes as well!

Sunday, 26 August 2012

Swingtime

Our house came with a baby swing in the garden.  As you can see this has been brilliant and well used by both children.  Now though, they are both too big for it and it's a little redundant.
So yesterday I took down the swing, and inserted in its place a bike tyre that had been hanging unused in the bike shed.  Now they have a swing that they can both use without any help from me!  Result!  It's not perfect, but it's definitely better than a swing that neither of them can use.


Friday, 24 August 2012

An invitation to play

What is an invitation to play?

There are some much better explanations than I could give, both here on www.teachpreschool.org and here on The Imagination Tree.  I recommend a visit to both.

Basically, while still allowing the children to play freely and choose what they want to do, you set up some materials in an inviting way that catches their imagination, and they just come over and play with it.  You don't need to buy anything special, you just use the materials and toys you already have in your house and present them in an interesting way.


Here's an invitation to play that I set up yesterday.  I put it out while the little ones were napping, and when they came downstairs and found it, they were immediately hooked, and played alongside one another for about two hours!  I used a grow-bag tray from the garden, put some chickpeas in it (they won't be eaten now, but will be used as stuffing in some beanbags), and set out the few Duplo pieces that we have around the edge.  After about twenty minutes I also brought some pots, as they were both engaged in picking up the chickpeas with the little Duplo spades and wanted somewhere to put them.

Thursday, 23 August 2012

A long weekend on the Black Isle

Having found camping with small children a challenge (a baby who insisted on being very tired and needing mummy right now when we were trying to put the tent up, as well as the combined Scottish camping fun of weather and midges), we went this Spring and bought ourselves a caravan.  I've never thought of myself as somebody who would use a caravan, but I admit, the advantages of having an easy-to-use kitchen there ready for you, and not having to traipse across a field in the rain to get to the toilet in the night have converted me a bit (quite a lot actually!).  I do aim to get back to "proper" camping in a few years when the children are a little older, but am happy in the caravan for the time being.

For our second trip away we headed up for a long weekend to the Black Isle, just north of Inverness and between the Moray and Cromarty Firths.  Our caravan site was the Caravan and Camping Club one at Rosemarkie.  The site is strung along the beach between Rosemarkie and Fortrose, which meant, as we had beautiful weather, that we woke every morning to the calm and stunning Moray Firth.  We had views across to Fort George, and just a twenty minute walk along the beach was Chanonry Point, the most reliable place in the UK from which to watch dolphins.  You can pretty much be guaranteed sightings of wild bottlenose dolphins only a few metres off shore, one hour after low tide every day.  So we spent a lot of time playing on the beach, paddling, walking along the beach (C went on his bike on the firm sand), playing with pebbles, watching dolphins and exploring the area.  I made an error in not anticipating gorgeous weather, and packed too many long sleeves and warm jumpers (again) and not enough shorts and sun-hats, especially given how often the two children were in and out of the water with or without clothes on!


This is Dunrobin Castle, the fairy tale palace belonging to the Dukes of Sutherland.  Absolutely gorgeous, but sadly paid for in the grief of so many highlanders evicted from their lands during the Clearances.

Wednesday, 22 August 2012

Garden bounty

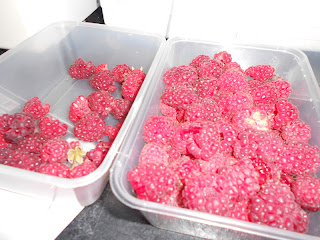
I've been off on my travels again, this time a caravan trip watching the dolphins at Chanonry Point on the Black Isle in Scotland.  I'll post more on that another day.  In the meantime, for a quick post as I've lots of Scout things to do today, here are some pics of some of the exciting bounty in my garden.  I've had crops of potatoes, plenty of peas, lettuce, a bit of radish, I think I've got some runner beans and some courgettes on the way, I've had a few cherry tomatoes (though the other tomatoes are running very late and I don't think I'll get any fruit before the days are too short) and best of all - my raspberries have been amazing!  This is my second crop and I have another load ripening just now.  It's awesome.


By the way, if anybody knows anything about growing veg, I'm having issues with cauliflower - they seem to have bolted.  I had some lovely little compact florets growing, and then suddenly they've all spread out and turned into full on flowers.  Could this be because I'm growing them too close together?  Any advice appreciated.

Thursday, 16 August 2012

Papier Mache train tunnels.

I might be wrong here, but I'm guessing that most children have a toy wooden train set at some point in their pre-school years.  Certainly my two nephews and my children do.  C loves his trains.  We started with a figure of eight set up with Thomas the Tank Engine, and Annie and Clarabel the coaches and now have at least seven engines with appropriate tenders for the steamies, and also a variety of trucks and coaches.  The track has grown with the addition of a turn-table bridge, a set from Tesco and a Big Jigs extension set which allows for all sorts of junctions and crossings.  Are you beginning to get the impression that I love building the tracks as much as C does?  C is now capable of putting the track together himself, though he needs help getting the ends to join up; while Bug adores the trains and will happily pick up an engine and drive it around the track for ages (though she's not quite delicate enough yet and this game is invariably followed by wails of despair from big brother as she's sat on the bridge or something).  While big cousin D was staying I thought that making some tunnels for the trains would be a great way to give him some papier mache experience.

I cut up an Amazon box for the bases.

Cut up some cereal boxes and tape them in place curved over on the base to provide the skeleton of the tunnel.  I also made a cave for a toy wolf.

Make the paste with flour and water.  It needs to be pretty gloopy.

Build up the sides of the tunnel to  make hillside type contours using screwed up balls of newspaper dunked in the paste and shaped with your fingers.

Tear up newspaper into squares and strips.  Stick these with the paste all over the outside of the tunnel, making sure they overlap and criss-cross as much as possible.  I've found that the best way to do this is to generously brush paste all over the outside, then stick the strips and squares down all over, followed by another generous coat of paste.  Any bumpy bits or dry bits can be moulded or pasted with your fingers.  Make sure that the whole model is covered by the newspaper, including folding some over the ends of the tunnel and into the inside.  If any is coming over the edge of your base this isn't a problem as it will be trimmed afterwards.  If you are making a cave, then don't forget to add bumpy bits and texture by doing papier mache on the inside too.

It is quite a messy activity, and I strongly recommend a wipe-clean tablecloth or newspaper over your surface and also aprons.

Once you've done a few layers, put them somewhere warm to dry for at least twenty-four hours, preferably longer.


After the models are dry, trim the edges of the base and then paint.  We were aiming for green on the top and black inside the tunnel, but I made the mistake of putting the black out first, so the green was mostly black too by the time it had been well mixed.  

I love papier mache.  As a modelling activity it's hard to beat for versatility, ease of finding equipment, ease of technique and opportunities for getting dirty. The children certainly enjoyed making these models, and D was delighted to take home his very own hand-made tunnel for his trains.

Monday, 13 August 2012

How to... clean a deep fat fryer?

I'll admit the shameful truth... I have never cleaned the deep fat fryer.  I hear the gasps of horror.  It came with the husband (over five years ago), and as I've never owned one before I've never known where to start with cleaning it, and so I haven't.  I think Hubby might have done it once - he's certainly changed the oil.  I never have.  In my defence, it doesn't get used very often, maybe once a month at most.  It's been on my "to-do" list for some time.  Last week I decided to be brave and do it.

First I ordered a universal (cut to size) deep fat fryer filter from Amazon.

I emptied the oil into an old milk bottle using the cut off top of another milk bottle as a funnel.  Then I wiped around the inside with some paper towels and removed the gooey disgusting mass that was supposed to be the filter.  All of that went in the bin.

I then set to work with a combination of hot oil, an old nail brush, bicarb of soda and white vinegar.  Inside I put some white vinegar and water and switched the fryer on, with the basket in upside down (because the crusted on grease was around the top of the basket).  The hot vinegar and water solution made removing crusted on grease from the inside much easier.  I rubbed a paste of bicarb of soda and water all over the outside, and then removed it with damp paper towels and then cleaned off with a damp cloth.  I got into nooks and crannies with white vinegar on the nail brush.

I've now inserted the new filter and I'm good to go with some fresh oil next time that I want to use the fryer.

It's not perfect, but it's definitely a lot better than it was before, and I think that now that I know what to do I might tackle it a bit more frequently!

Any further hints and tips on cleaning fryers would be gladly received (or ovens - mine's not too bad - but any ideas to make the job easier?).


Saturday, 4 August 2012

Ten things that a three-year-old can do for themselves...

Of course this is different for every child.  C has only just turned three, and we'll be building on his skills and independence as the year progresses, but here are a few of the things that I expect him to do now:


  1. brush his own teeth (with supervision and reminders on technique)
  2. get dressed and undressed by himself and put dirty clothes in the laundry
  3. tidy up his toys at the end of the play session
  4. lay the table (with supervision and guidance)
  5. blow his own nose
  6. straighten his own bed (and take the pillowcase off when it's time to change the bedding)
  7. use the potty when necessary and wipe after a #1.
  8. wash his own hands
  9. pour his own drink (when the jug isn't too heavy)
  10. choose his outfit for the day

Friday, 3 August 2012

Her favourite words.

These are the ten favourite words used by Bug, who is now approaching 18 months:


  • no - regularly and vehemently
  • mummmmeeeeee - in a plaintive, piteous tone, which means "mummy I need you for a cuddle right now"
  • daddy! - in a gurgle of pleasure as he arrives home from work
  • weah - which can be translated as "yes", in answer to a question.
  • buh, buh - as she goes to fetch a book from the bookcase or basket and climbs on to your lap with it
  • deddy - (teddy) wailed from the bedroom when she's dropped him out of the cot or can't find him.
  • there - when you're looking at the pictures in a book and asking her, "where's the cat?", her chubby finger points at it with a triumphant "there".
  • boo's (boots) - as she fetches her wellies yet again from the shoe cupboard and sits down to try to put them on
  • ball, ball - this can be a balloon or a bubble, but is usually as she fetches one of the Waggy-tailed-one's balls from the basket to throw for her, or a football in the garden.
  • bike / lorry / car / tractor - whenever she spots them, gleefully.

Thursday, 2 August 2012

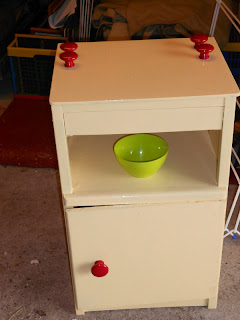
A transformation - craft project to make a wooden toy cooker.

For his third birthday C told me that he'd like a "little kitchen".  Bug had got a small plastic, battery operated, noisy kitchen for her birthday from a friend, and he loves it.  Sadly for him I prefer wood and recycled to plastic and noisy!  So I transformed an old broken down bedside table from our local furniture recycling project into a cooker...

1) Buy or find an old wooden bedside table.  (Mine cost £5).  Take the door off and the drawer out:

2) Use an electric sander to sand it down:

 3) Give it a coat of primer (a fresh tin found in the cellar):

4)  Then a couple of coats of gloss paint (the end of a tin found in the cellar - in hindsight this might not have been the best stuff as it remained quite tacky on the corners and edges, Mum suggests this might have been because of the age of the paint):

5) Re-attach hinges.  I had to buy some new ones as they were broken, and I messed the job up in many many ways.  Eventually I asked Hubby to sort them out while I went away on hols!

6) Fix on a door knob for the oven, and some more for the hob switches.  Mine had to go at the side and back because there was wood underneath in other areas so the screw wouldn't have got through.  You'll need to use a drill to make the holes.

7)  Attach some form of hob rings.  I cut out some circles from a cardboard box and painted them black before sticking them on.  Other options would be silver coloured circular cake boards.
And there you have it!  A finished cooker.  I'm proud that I actually finished a project that I had planned, and on time too.  And I'm kind of pleased with the results.  It's not perfect.  The hob rings are a bit ragged around the edges, the door hinges were disastrous and the paint remains a little tacky - but hey - I made a toy cooker!  With power tools!  Out of wood!  All by myself!