Banner

Tuesday, 12 March 2013

Latest creation - crochet hat

Here's the deal.  I'm a crochet beginner.  I mean a total beginner.  I bought myself a crochet hook and a crochet book with the book tokens that I got for my birthday back in September, but I didn't allow myself to touch them until after I'd got everything done in the crazy pre-Christmas rush.
I took them with me to Devon at Christmas, and asked my mum (who can crochet) to help me to make head or tail of the instructions.  I managed to successfully achieve chains, and even linking chains before I left there.  Then I made a start on the second item in the book, which involves rings in double crochet to make a hat.  Now, I don't know how many of you can crochet, or in fact how many of you own the same book as me ("First Crochet" by Lesley Stanfield), but for some reason my hat doesn't look the same as the one in the book, even though I used the same size hook. 
I asked a friend what she thought, and she said it looks as though I've done every stitch while they've done every other - does that make sense?
Can any of my reader(s) help me to work out where I went wrong?
To be honest I'm not too bothered about this hat, as you can see the doll is very happy with it, it's just that I might want to crochet again at some point, and it would be useful to know what I need to do to do it properly.
 

Sunday, 10 March 2013

A fishy story

This gorgeous mobile (no, don't ask me why the photo comes out sideways on my blog when it was the right way up in my computer!) is very fishy, and also a lot of fun for two small people.
 Here's what we used: holographic card, sparkly sequins and jewels and sticky stars, glue, scissors and pencil, needle, thread and blutac, wooden dowelling (just a few bits lying around, you could use sticks from the garden).
 First I drew and cut out some basic fish shapes in a whole variety of sizes from the holographic card, then I set the children loose with the glue and sparkles to decorate them.  They both also cut out some more holographic card to add to the decorations.
Once the fist were on their way to being decorated I started to tie the dowelling, and hung it above us in the kitchen.  As each fish was finished I made a hole in the top of it using the needle and the blu-tac, put some thread through and tied it to the dowelling.  This bit is tricky as it always needs to be balanced.
The finished article looks amazing, it moves in any air, and the fish sparkle in the sunlight.  It really fits in with our water/sea theme this month, and follows on nicely from our visit to "Deep Sea World" just outside Edinburgh on Thursday.  Unfortunately I kept bumping it with my head where it was hanging in the kitchen, so it has migrated to C's bedroom, where it has a bit more space to work the magic.

Tuesday, 5 March 2013

This month's make

Unbelievably I've already finished my nephew's first birthday present, and he isn't one until the end of June!  Those who've been following for a while will know that I've knitted a few of these.  For C for his first birthday, then one each for my two nieces when they were one, one for Bug on her first birthday, and now this one for the smallest of the generation.  Sadly the two older nephews missed out, but by the time I'd started knitting they weren't interested in anything unless it was Fire Engine shaped.  I'll make them something good further down the line.

The pattern is from
 

Monday, 4 March 2013

Simple crafts for crazy kids - crocs and snakes

This simple craft activity is so easy to do, and different aged children can do as much or as little as they can manage, but you don't end up spending ages finishing off for them.

For the snake:
  • Take a piece of coloured A4 paper, cut off the corners to make a rounded shape, then cut into a spiral.
  • Draw a face at one end - your choice whether it goes on the inside or the outside of the spiral.  You can stick on googly eyes and a forked tongue as well if you like.
  • Lay it down flat and colour a suitably serpentine pattern.  
  • Hang it up from one end - finished


 For the crocodile:

  •  Take a green piece of paper and draw on a long crocodile shape.  He needs to have sticking up eyes, and a spiky back.
  • Leaving the face and tail unfolded, fold the rest of the crocodile in concertina style.
  • Decorate the crocodile if you like.
  • Stick two lolly sticks or straws to the back of the crocodile at each end of the concertina section.  This gives you an excellent wiggly crocodile.  My two had great fun with the crocodiles chasing one another.
On a side note, it's interesting to note that the noise they make when they are being sharks is "duh - duh, duh - duh" (Jaws style - as that's the noise I make when I'm being a shark too), while if they are a crocodile they go "tick-tock, tick-tock" - you can't go wrong with Peter Pan!


Sunday, 3 March 2013

Bug's new bed

Bug is now a big girl.
Not long before her second birthday we decided that it was time to transition from cot to big-girl-bed.  Her bedroom is a little tight for space, so we had decided some time ago that she was going to have a cabin bed. Our selection criteria were that it:

  • should be wooden
  • should be sturdy, as we want it to last into her teens
  • should have a decent rail - she's still quite little and I don't want her falling out
  • should have steps (however steep), rather than a ladder with rungs.  Again, she's only little, and I want to make it as easy as possible for her to get in and out safely.
This is what we ended up with: 
We spent a Friday evening assembling all the different components and then, very excitedly, she climbed in.
Unbelievably, she has yet to try to climb out during the night.  She seems to accept that she is supposed to stay in until morning!  She loves her pillow and her duvet, and she loves that Mummy or Daddy come in for a cuddle and a story at bed time, which we obviously couldn't do with the cot.

There's a little corner at the end of the bed where the shelves are, which I have filled with her bean bag, cushions and soft toys - it's her story corner.  If, at any time, she goes quiet and I don't know where she is, she'll either be in bed with a book, or in her story corner with a dozen books.
As you can see from the pictures, C loves his sister's bed too.

 Now I'm just keeping an eye out for a solid wooden chair, which I'm going to paint to co-ordinate with her bedroom, to go with the desk part of the bed.

Friday, 1 March 2013

Our Secret Den

It's fair to say that as far as this blog is concerned... I've been pretty useless lately.  Thankfully it's just in terms of the blog.  With everything else I am doing pretty well!  So:

  • my house is relatively clean - as clean as any house is where it isn't top priority and you have a dog and two small children.
  • the laundry is done
  • the children are happy
  • I am happy
  • I am very busy with Scout tasks various.

But I am resolved to get the blog back on form too.


 Back in January we started going to our "secret den".  I wanted to wait until Bug was confident enough on her feet that time spent in the woods wasn't going to involve too much time tripping and stumbling.  In the woodland alongside the golf course, there is a magnificent shelter.  I think it was made during a project on the Clearances by the children from the village Primary School, but it's also been expanded and used by "Mucky Pups", the local after-school club.  We wander along (with two small ones it's about a fifteen or twenty minute walk), and then spend up to an hour just playing in the pine woods there, using the shelter (sorry, "secret den") as our base.

Since it's pretty cold at this time of year I always take a flask of soup and wrap them up warm, but I'm also teaching C about hide-and-seek, and Tag and other good running around games, and we do lots of balancing and climbing too.
This is what I envisaged when I wanted to have children.  Lots of time playing outdoors, regardless of the weather!

Thursday, 7 February 2013

Dolls clothes patterns

I've got a parcel of outgrown clothes to post to my sister, but want to include a little present for her children too.  I'm thinking some form of stationery for my 5 year old nephew, which I'll let C choose, a toy that Isobel no longer plays with for the baby nephew, and an outfit for my 2 year old niece's doll.

However.... I don't have any dolls clothes patterns!  Here are a few that I found on the internet:

A whole selection of patterns if you want to buy them.  Minerva Crafts have a huge selection.
Simplicity Sewing Pattern - Doll Clothes Sizes: OS (ONE SIZE)
Sew Essentials also has a large range of Kwik Sew patterns that you can download, but a bit more expensive.
Clothes For 18 Inch Doll Kwik Sew Sewing Pattern No. 3965. One Size.

The best that I've found though, in terms of being both free and incredibly simple - because my niece is only two and I also want to make them quickly - are here on the We Wilsons blog.  

I can't wait to get started (though I've a ton of work for my Scout role to do first!) and will post on here again in the next day or two and show you how I got on.

All pictures here are from the websites I've linked to in the text above them.

Wednesday, 6 February 2013

Quick and Easy Craft Ideas for Toddlers - Sticking

I'm sure that I've mentioned this on here before, but it's such a great activity, so easy and yet allowing them to practise so many skills that I'm going to put it on again.
What you need: some paper - preferably allow them to choose their colour; some glue - you can use PVA and a spreader or a glue stick (I like to vary it so that they get practice at both); some scissors - zig-zag ones make a change; old newspapers, catalogues or magazines - our theme for January was "plants" so we had out the plant catalogues.
What to do
Get the children to choose their paper colour and decide which way up it will go.  This is a useful TEACHING POINT - you can introduce the vocabulary of landscape and portrait.

Give them a catalogue and depending on their age and ability or inclination, or whether you are focusing on cutting skills or sticking skills, they either cut out whatever pictures take their fancy, or you do.  
Once they've got a good selection of pictures, encourage them to work out where on the paper they are going to stick them.  This is another TEACHING POINT - you are encouraging them to think through their art work before they launch into it.
Then they get sticking.  Depending on their age and experience you'll have a few different teaching points here too - do they put the glue on the paper or on the picture to stick?  Does the glue go on the back or the front of the picture?  How much glue do they need?  Should the glue go in the middle or around the edge?
It's so much fun and they love the results.

Tuesday, 5 February 2013

What to do with limes

I have five limes sitting in my fruit basket.  They've been there for a couple of weeks and are definitely now past their best.  I needed one for a recipe, but this particular supermarket only sold them in packs of 6.  For some reason we aren't drinking much G&T at the moment, so the limes are just sitting there.  So a quick web-search has revealed the following uses for my limes:

image from www.journeytom.com
Get a case of Corona, put a wedge of lime in the top of each bottle and drink.  I'm liking this one, though I'll need to drink a lot of Corona to use up 5 limes!

Squeeze the juice and freeze it to use in future recipes.  Very practical.  I'm liking.
image from www.whatscookingamerica.net
Slice and freeze, ready for when we are back on the G&T in the future.
image from www.freeextras.com 
Yoghurt, mint and lime marinade - for any meat.  (from Jamie Oliver's The Naked Chef): 1 pint natural yoghurt, 2 handfuls of chopped fresh mint, zest and juice of two limes, 1tbsp coriander seeds (crushed), salt and pepper and a couple of tbsp olive oil.  Mix together all the ingredients and smear over the meat - leave to marinade.
image from www.jamieoliver.com 
Refreshing drink - slice the limes, add a cupful of white sugar.  Mash the limes and sugar until all the sugar has dissolved.  Leave to stand for ten minutes.  Top with 6 cupfuls of water and a cupful of ice and serve in tall glasses.
Coconut Lime Pancakes
image from www.ocado.com 
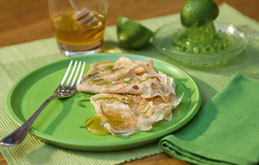
Pancakes with lime and sugar instead of lemon and sugar.

I'm loving these ideas!

Sunday, 3 February 2013

Simple crafting - coats for teddies!

 It all started with the little "Goldilocks and the Three Bears" house that I (cough - Mrs Santa) made for Bug.  Daddy Bear has on a green waistcoat.  Suddenly Bug decided that Teddy - the love of her life - needed to put on the waistcoat, but it wouldn't fit!  I offered to make Teddy his very own waistcoat, and she was delighted to be able to choose the colour.  She also insisted that it needed to have a button.  So Teddy has a red waistcoat.  It wasn't long before C brought me Bunny (I knitted Bunny for him when he was just a bump).  Bunny needed not only a long purple waistcoat, but also a hat.
The method is very easy.  Use felt, it comes in a variety of colours, is very forgiving and doesn't need any hemming.  Use the teddy to design your pattern, fold over the felt when you cut it so that it's the same on both sides.  Cut the shapes you need, and then stitch any joins, using a co-ordinating thread.  Sew on any buttons you want, and use narrow ribbon to make a loop to fasten the button.  It might not look as though it will appear on a catwalk any time soon, but your toddler will love it - and the fact that they can ask for it and it will be complete in just half an hour suits even their impatience!