Banner

Thursday, 31 October 2013

Pre-school craft - beautiful pressed flower window decorations.

If, like me, you have interior doors with glass panels, and also small children, then you'll know that they get a lot of finger-prints all over them.  One way to make sure that you don't notice the finger-prints is to decorate the panels - because you're so busy looking at the decoration!  Plus it just looks gorgeous.  You can use these to decorate any window really.
Contact Paper Window Decorations
I've made these before using squares of coloured tissue paper as the decorative item, and they look very effective - almost a stained glass effect.  I've also had the idea of using those metallic table decoration confetti type shapes - which you can get in star shapes, amongst others.  On this occasion we used pressed flowers, which looks lovely.
What you need:  Contact paper (sticky backed plastic) - you can buy this from any stationers, most Post Offices and larger supermarkets; pressed flowers;
  1. Cut out a square or rectangle of contact paper that's smaller than your window.  Peel off the backing and lay it sticky-side up in front of your youngster.
  2. Give them a variety of leaves and pressed flowers (or other decorative items) and get them to choose a few to use.  Don't let them use too many, because if they cover up all the contact paper then it won't have any stickiness left to stick to the window.
  3. Encourage them to arrange them on the contact paper.  They need to be very gentle with the pressed flowers, and they won't be able to pull them off and rearrange them without damage.
  4. Stick them to your window and admire.  The pressed flowers look particularly lovely with some sunshine coming through, but also with a light behind them too or against a white background (our wall paper is a light faun colour).


Tuesday, 29 October 2013

Pre-school crafts - Castle pencil pots - tutorial

We decided to make some pencil pots for the children's desks.
Step 1 - With your children, raid your recycle box to find likely materials.  We used cereal box card, yoghurt pots, a tin can and the bottom of a small food package box.
Step 2 - Cut out the base from cereal box card and then arrange your pots to your satisfaction.  We went with four pots each.  Tape them securely both to one another and to the base.
Step 3 - Cut or tear small squares of kitchen roll tissue paper.  Use a mixture of 50:50 PVA glue and water and stick these all over the structure, taking care to overlap them and not to leave any gaps.  Don't forget the inside of the pots.  Small children may well lose interest during this process, so leave them to do it themselves as much as possible, and step in to finish off when they lose interest.
Step 4 - Leave it to dry.  This takes at least 24 hours.
Step 5 - Paint it in your choice of colour, you might want a blue moat, or green grass ramparts.  It's up to you.  C chose dark grey, as it's night time, and Bug chose red with a moat around.  When the paint has dried you can add embelishments with more paint or marker pen.  C has yellow windows for the candle light shining out, while Bug has black windows and some stonework.  You can also add flags and banners if you wish.


Tuesday, 15 October 2013

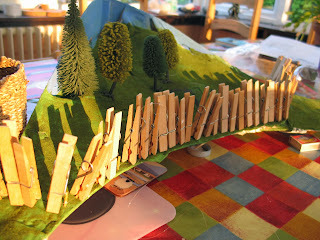
Progress on the model railway - the fence

So for those of you interested in models and model railways etc. I have posted on progress on the model here and here.

I finally finished the fence which has been causing me a problem for some time now.

I spent an hour several weeks ago:


  • carefully chopping the heads off matches, 
  • cutting the matches in half
  • painting the matches with brown watercolour paint


Now it was time to work out how to make the fence wire.  First I glued the fence posts on to the scenery.  This was quite successful.  Then I tried to glue the wire (plastic thread for bead work) on to the posts.  This wasn't successful.  In order to hold it in place to allow it to dry I pegged the wire in place on each post.  The washing pegs were too heavy, so pulled many of the fence posts over.  In addition, when I pulled off the pegs it turned out that the wire was more stuck to the pegs than it was to the fence posts, so the whole thing fell to bits.

This time I've done it mostly the other way around.  I pulled the wires tight between some books, and carefully placed glue covered fence posts into place.  When this was dry this was the main portion of fence done.  Now I had a problem though, this fence section was too short for the area it needed to surround, but now there wasn't enough wire at the end for me to hold in place taut.  I stuck the fence on to the scenery, then I stuck further fence posts in place at both ends.  I haven't actually finished the fence in the strictest sense, because I'm still carefully gluing the wires on to these extra posts, wrapping around both sides of fence posts (instead of neatly on the inside) but just trying to get the wires fixed to the posts.

I've now ordered some sheep for C.  Up until now we haven't been able to order any sheep because without a fence in place they'd be wandering all over the train track, but now that the fence is there, we feel confident to put some sheep on the scenery.  Another picture with sheep in situ to follow in a couple of weeks.  I've also made a pretty good start on the Village School from Metcalfe Models.

Monday, 14 October 2013

My Life in Scouting

Hey ho.  Since I spend soooooo much time Scouting.  I thought I'd add a new blog to my portfolio.  So for any Scout type people out there, or for anybody who just wants to know what a crazy Scout volunteer gets up to in her 'spare' time - you might want to follow My Life in Scouting.

Saturday, 12 October 2013

Mellifying the caravan.

For my birthday Bug bought me some sunflower stickers for the caravan...
 Today I cleaned the front of the van and put on the stickers - aren't they ace?!  Since we're unlikely to be selling the caravan on when we've finished trashing it (oops, I mean, using it for lots of holidays with two small children) we've decided to put our own personal stamp on it and make it very individual to reflect our family personality.  We've lots of plans for the interior too!

Thursday, 3 October 2013

Play park - Why bother? Part 2

I've been AWOL again, disappeared in a mountain of Scout activity which all required preparing, planning and following up.  Now I can breathe again for a little while, though there's still plenty to be done.  I'm thinking about starting a "Scouting Life" blog too, all about the Scouty type things that I get up to.

But back to this blog.  I posted two weeks ago about how the play park is of benefit to your children, but lets face it, standing alone in a windswept play park pushing a swing can be pretty soul destroying.  How can you get to enjoy the play park as much as they do?  Here are a few ideas.

  1. Take a friend.  Don’t go to the play park by yourself.  If there are two or more of you, then you can chat as you push swings, or sit and chat while the children play.  The more of you there are the better, take a picnic and make it an afternoon out, lo


    ts of space for children of different ages to play and time for parents to catch up on the gossip.
  2. If you can’t manage to persuade anybody to join you, then take a magazine or book.  Don’t make it a page-turner or you may forget to keep an eye on the children!
  3. Take a flask of coffee and a snack (and I suppose you could take a snack and drink for the children too!).
  4. Join in!  There’s no rule that says once you’re a grown-up you have to stop playing.  Observe any rules about maximum ages on equipment, but for most equipment its just about common sense – if it looks a bit wobbly, you won’t fit in it, or playing on it will cause a danger or worry to small children, then don’t go on.  Your children will love to see you climbing, swinging and clambering, and it’s good for your fitness and strength as well.  Children should see the playful side of their parents as often as possible. 
  5. Trips to the play-park needn’t stop when it’s cold, snowy or rainy; they just take on different challenges.  Put the children in full waterproofs with grippy shoes.  In these conditions the flask of coffee and joining in yourself become more important than ever – if you stand in the cold you’ll soon become pretty grumpy and anxious to head for home.
  6. Set challenges for the children.  Make the playground into an obstacle course with a beginning and end – can they get all the way around without touching the floor?  Can they slide down the slide in ten different ways?  Can they climb to the very top of the frame?
  7. Strike up a conversation with a stranger… go on, I dare you!
  8. Be mindful.  Take the time to just sit with your eyes closed and listen to the sounds of the outdoors, smell the smells of the season, feel the breath of wind on your cheek.