Banner

Thursday, 31 October 2013

Pre-school craft - beautiful pressed flower window decorations.

If, like me, you have interior doors with glass panels, and also small children, then you'll know that they get a lot of finger-prints all over them.  One way to make sure that you don't notice the finger-prints is to decorate the panels - because you're so busy looking at the decoration!  Plus it just looks gorgeous.  You can use these to decorate any window really.
Contact Paper Window Decorations
I've made these before using squares of coloured tissue paper as the decorative item, and they look very effective - almost a stained glass effect.  I've also had the idea of using those metallic table decoration confetti type shapes - which you can get in star shapes, amongst others.  On this occasion we used pressed flowers, which looks lovely.
What you need:  Contact paper (sticky backed plastic) - you can buy this from any stationers, most Post Offices and larger supermarkets; pressed flowers;
  1. Cut out a square or rectangle of contact paper that's smaller than your window.  Peel off the backing and lay it sticky-side up in front of your youngster.
  2. Give them a variety of leaves and pressed flowers (or other decorative items) and get them to choose a few to use.  Don't let them use too many, because if they cover up all the contact paper then it won't have any stickiness left to stick to the window.
  3. Encourage them to arrange them on the contact paper.  They need to be very gentle with the pressed flowers, and they won't be able to pull them off and rearrange them without damage.
  4. Stick them to your window and admire.  The pressed flowers look particularly lovely with some sunshine coming through, but also with a light behind them too or against a white background (our wall paper is a light faun colour).


Tuesday, 29 October 2013

Pre-school crafts - Castle pencil pots - tutorial

We decided to make some pencil pots for the children's desks.
Step 1 - With your children, raid your recycle box to find likely materials.  We used cereal box card, yoghurt pots, a tin can and the bottom of a small food package box.
Step 2 - Cut out the base from cereal box card and then arrange your pots to your satisfaction.  We went with four pots each.  Tape them securely both to one another and to the base.
Step 3 - Cut or tear small squares of kitchen roll tissue paper.  Use a mixture of 50:50 PVA glue and water and stick these all over the structure, taking care to overlap them and not to leave any gaps.  Don't forget the inside of the pots.  Small children may well lose interest during this process, so leave them to do it themselves as much as possible, and step in to finish off when they lose interest.
Step 4 - Leave it to dry.  This takes at least 24 hours.
Step 5 - Paint it in your choice of colour, you might want a blue moat, or green grass ramparts.  It's up to you.  C chose dark grey, as it's night time, and Bug chose red with a moat around.  When the paint has dried you can add embelishments with more paint or marker pen.  C has yellow windows for the candle light shining out, while Bug has black windows and some stonework.  You can also add flags and banners if you wish.


Tuesday, 15 October 2013

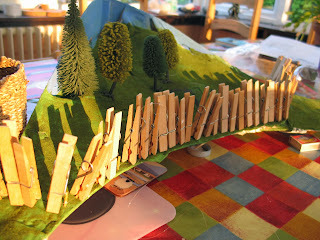
Progress on the model railway - the fence

So for those of you interested in models and model railways etc. I have posted on progress on the model here and here.

I finally finished the fence which has been causing me a problem for some time now.

I spent an hour several weeks ago:


  • carefully chopping the heads off matches, 
  • cutting the matches in half
  • painting the matches with brown watercolour paint


Now it was time to work out how to make the fence wire.  First I glued the fence posts on to the scenery.  This was quite successful.  Then I tried to glue the wire (plastic thread for bead work) on to the posts.  This wasn't successful.  In order to hold it in place to allow it to dry I pegged the wire in place on each post.  The washing pegs were too heavy, so pulled many of the fence posts over.  In addition, when I pulled off the pegs it turned out that the wire was more stuck to the pegs than it was to the fence posts, so the whole thing fell to bits.

This time I've done it mostly the other way around.  I pulled the wires tight between some books, and carefully placed glue covered fence posts into place.  When this was dry this was the main portion of fence done.  Now I had a problem though, this fence section was too short for the area it needed to surround, but now there wasn't enough wire at the end for me to hold in place taut.  I stuck the fence on to the scenery, then I stuck further fence posts in place at both ends.  I haven't actually finished the fence in the strictest sense, because I'm still carefully gluing the wires on to these extra posts, wrapping around both sides of fence posts (instead of neatly on the inside) but just trying to get the wires fixed to the posts.

I've now ordered some sheep for C.  Up until now we haven't been able to order any sheep because without a fence in place they'd be wandering all over the train track, but now that the fence is there, we feel confident to put some sheep on the scenery.  Another picture with sheep in situ to follow in a couple of weeks.  I've also made a pretty good start on the Village School from Metcalfe Models.

Monday, 14 October 2013

My Life in Scouting

Hey ho.  Since I spend soooooo much time Scouting.  I thought I'd add a new blog to my portfolio.  So for any Scout type people out there, or for anybody who just wants to know what a crazy Scout volunteer gets up to in her 'spare' time - you might want to follow My Life in Scouting.

Saturday, 12 October 2013

Mellifying the caravan.

For my birthday Bug bought me some sunflower stickers for the caravan...
 Today I cleaned the front of the van and put on the stickers - aren't they ace?!  Since we're unlikely to be selling the caravan on when we've finished trashing it (oops, I mean, using it for lots of holidays with two small children) we've decided to put our own personal stamp on it and make it very individual to reflect our family personality.  We've lots of plans for the interior too!

Thursday, 3 October 2013

Play park - Why bother? Part 2

I've been AWOL again, disappeared in a mountain of Scout activity which all required preparing, planning and following up.  Now I can breathe again for a little while, though there's still plenty to be done.  I'm thinking about starting a "Scouting Life" blog too, all about the Scouty type things that I get up to.

But back to this blog.  I posted two weeks ago about how the play park is of benefit to your children, but lets face it, standing alone in a windswept play park pushing a swing can be pretty soul destroying.  How can you get to enjoy the play park as much as they do?  Here are a few ideas.

  1. Take a friend.  Don’t go to the play park by yourself.  If there are two or more of you, then you can chat as you push swings, or sit and chat while the children play.  The more of you there are the better, take a picnic and make it an afternoon out, lo


    ts of space for children of different ages to play and time for parents to catch up on the gossip.
  2. If you can’t manage to persuade anybody to join you, then take a magazine or book.  Don’t make it a page-turner or you may forget to keep an eye on the children!
  3. Take a flask of coffee and a snack (and I suppose you could take a snack and drink for the children too!).
  4. Join in!  There’s no rule that says once you’re a grown-up you have to stop playing.  Observe any rules about maximum ages on equipment, but for most equipment its just about common sense – if it looks a bit wobbly, you won’t fit in it, or playing on it will cause a danger or worry to small children, then don’t go on.  Your children will love to see you climbing, swinging and clambering, and it’s good for your fitness and strength as well.  Children should see the playful side of their parents as often as possible. 
  5. Trips to the play-park needn’t stop when it’s cold, snowy or rainy; they just take on different challenges.  Put the children in full waterproofs with grippy shoes.  In these conditions the flask of coffee and joining in yourself become more important than ever – if you stand in the cold you’ll soon become pretty grumpy and anxious to head for home.
  6. Set challenges for the children.  Make the playground into an obstacle course with a beginning and end – can they get all the way around without touching the floor?  Can they slide down the slide in ten different ways?  Can they climb to the very top of the frame?
  7. Strike up a conversation with a stranger… go on, I dare you!
  8. Be mindful.  Take the time to just sit with your eyes closed and listen to the sounds of the outdoors, smell the smells of the season, feel the breath of wind on your cheek.

Monday, 16 September 2013

Why should we take the children to the Play Park?

Everybody knows that children love to go to the play park – but is it of benefit for them?  And how do you get to enjoy it?  I’ll post this time about the benefits of the play park, and next time about how you get to enjoy it.

Play parks allow children to explore and develop balance and strength in a safe environment.  While some of us are lucky enough to live in rural areas where we can allow our children to build dens, climb trees, and play in streams, many are not so fortunate to have the space or the confidence to encourage this type of play in their children.  In urban areas a play park may be one of the few safe places for children to play.  It certainly beats building sites or derelict buildings!

Play parks provide a space to burn off energy and run around without causing stress.  A play park is usually in a fenced in area, so even young or more impulsive children can be given freedom to run and play without too much adult interference.  In the fresh air children can be allowed to just run and climb and jump without you constantly worrying that they’ll be upsetting the neighbours or breaking things in the house.  Physical exercise as children is crucial for their development, and for their lifelong health.  Enjoying exercise and movement at a young age is a great start for them.


Play parks provide opportunities for children to meet new people, and to learn harmonious social interaction.  Whether or not your children are used to spending time with other children, whether they attend toddler groups, pre-school or school, have siblings or not – they will all learn something from playing at a play park.  There is play equipment for a start, and there’s a certain etiquette that needs to be learned, from waiting your turn on the swings or the slide, to making sure not to step on somebody’s fingers on the climbing frame, giving someone else a turn on something or just working around somebody else’s game.  There are children of a wide range of ages and abilities.  Children need to learn to be careful of smaller children, to stand up for themselves with bigger children if need be, and to just generally be kind to others.  You’ll find that on busier play parks, just like in a big city, children tend to ignore one another; children might be quite happy to play alone on a quiet play park; but on a play park where there are a few children, they will quite often just start playing together.  It’s usually instigated by the more confident child, “Hello, I’m Isla, what’s your name?”.  They’ll happily play together until it’s time to go.

Friday, 13 September 2013

Embrace the Camera

My turn to get in front of the lens.  C took this picture yesterday.

Wednesday, 11 September 2013

How to be Free: SAIL AWAY FROM RUDENESS AND TOWARDS A NEW ERA OF COURTESY, CIVILITY AND GRACE

I’m writing a series of blog posts exploring the books “How to be Free” and “The Idle Parent” written by Tom Hodgkinson.  I enjoyed a lot of the ideas expressed in these books, and think that exploring them further will help me to explore the principles behind my own way of living and parenting.


Chapter 23 – Sail away from rudeness and towards a new era of courtesy, civility and grace – BE GRACEFUL

Tom starts off by suggesting that capitalism and rudeness go hand in hand.  He suggests that the emphasis on “doing well”, “being successful” and “having money” get in the way of thinking about how other people feel and being kind to them.  People trying to sell you things you don’t want – bad manners; people focusing on their mobile phone when spending time with you – bad manners; to say nothing of the rudeness with which big business treats you if you owe them any money.  E-mails encourage abruptness, and often we spend time trying to fix misunderstandings and bruised feelings, just because we couldn’t be bothered to pick up the phone or write a more complete, and polite, e-mail.

Hospitality also goes hand-in-hand with good manners.  It’s important to look after our fellow humans, to extend a welcome to all.

Be cordial, be polite, think about how other people feel and don’t tread all over them in the race to be “better”.

How does this match up to the ink-spots-and-grass-stains life?


I can’t quite get my head around this chapter.  I’ll always strive to do my best and be successful, so according to Mr Hodgkinson, that makes me rude, despite the fact that I have no intention of treading all over other people or being rude on the way.  I use e-mail a lot, though I am conscious that in some cases a phone call would be better, and I do still try to write at least one pen and ink letter every week – I know what a pleasure it is to receive one, so I am always keen to give that to somebody else.  Hospitality is also something I think I could do better.  I try to make my home welcoming to everybody, and use the “make yourself at home” comment, but neighbours and friends rarely drop by, so I don’t get a chance to practise often.  Which reminds me, I must invite the next door neighbours over for a meal on Sunday, I’ve been meaning to do so for months.

Sunday, 8 September 2013

Fostering Independence - What can children do for themselves?

As I'm sure most mothers do, I want my children to grow up to be independent.  That isn't all - I also want them to be kind, happy, self assured, generous and honest.  But for now, lets look at independence.

What can children of different ages be expected to do for themselves?  Naturally every child is different, and some may be more or less eager or reluctant to do things for themselves, regardless of their actual ability.  C is quite reluctant to take responsibility for things, where Bug will insist on doing things for herself even if she physically can't do it yet - this morning I found her climbing on the kitchen cupboards so that she could get her own bowl out!
Here are some of the things that my children can, and are expected to do for themselves:

Bug - Age 2.5
  • gets her clothes out of the wardrobe (she can't reach the hanging rail yet so needs help there)
  • get her pyjamas and nappy off, wipe her bottom with a wipe, get herself dressed
  • select her breakfast cereal and pour it with help
  • choose her spoon and carry it through to the table
  • wipe face and hands after eating
  • sometimes carry her empty bowl or cup through to the kitchen
  • brush her own teeth with help
  • take herself to the toilet (help with wiping, help with hand-washing)
  • feed the fish with help
  • help hang the washing
  • carry her clean clothes through to the bedroom and help put them away
  • put her toys away when she's finished with them (for some reason she seems to think that this is my job!)
  • help sweep the kitchen
  • wipe the table
  • help clean up any spills
  • water her part of the garden
  • give the dog a snack
  • put her own shoes on when we're going out
  • be responsible for her own bag if she takes it out
  • at swimming change herself (she still needs help with the swimsuit)
  • ask the swimming pool attendant for a toy
  • at the swimming pool cafe collect her own cutlery and napkins
  • stirring and adding ingredients when cooking, chopping with help.
C - age 4
  • get up (not before 7am), go to the toilet, choose clothes and get dressed.
  • collect breakfast cereals, pour into bowl and pour milk with help
  • carry drink and spoon through to the other room
  • clear and wipe table
  • wipe own hands and face after eating
  • brush teeth (help with squeezing the toothpaste)
  • go to the toilet himself when needed
  • feed the fish and sometimes the dog
  • help with vacuuming and dusting, watering plants and cleaning windows
  • tidy up his own toys
  • put on shoes and coat
  • be responsible for own bag (still a struggle this one - he's a bit like a mad professor sometimes and would lose his head if it wasn't attached!)
  • get in and out of the bath and wash himself (help needed with hair)
  • at swimming change himself, dry himself etc.
  • ask the swimming pool attendant for a toy or float
  • at the swimming pool cafe collect own cutlery and napkins
  • when buying something, take the money to the counter, ask for what he wants, pay for it and wait for any change
  • open the car door, get in, and fasten seat-belt
  • chopping and grating, stirring etc when cooking
I'm sure there is more that they can and regularly do, but it's nice to see some progression here.  I'm trying hard not to do things for them if they can do them by themselves, however frustrating that is when I am trying to get out of the door and they are taking forever to put their shoes on.
Next steps for C include pouring more drinks himself; carrying bowls, plates and cups even when they have something in; washing his own hair and learning to shower himself;

I'm intrigued to see how this progresses - I'd love to know the types of thing that your children of different ages can do for themselves?