Banner

Sunday, 27 January 2013

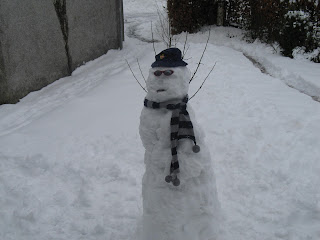
Groovy snowman!

Before the snow all melts or washes away in a torrent of rain I want to share with you our groovy snowman.
Isn't he gorgeous?  C insisted on the sunglasses, but wasn't impressed with my choice of hat, he thought one of my best ones would be better than one from the dressing up box.  Bug was most insistent that he should be wearing a scarf.  He did have a plum for a nose, but I just can't make it stay on his face.  C is disappointed that the magic hasn't worked and he hasn't come to life like the snowman in the film.

This picture was actually taken last week, and the mega snowfall that we had on Friday (another 12 inches) has now pretty much obliterated the snowman, who collapsed under the weight of so much extra snow.  Still, we all helped clear the driveway yesterday for an elderly neighbour, we've been out and about on the sledges, and C and I spent one twilight digging snow caves in the front garden, in which we placed tea-lights, to welcome Hubby home and light his way up the path.  A little bit magical.  I'll confess, I now want to get back to going jogging in the evening, being able to go out for a walk with the children (the snow is just too deep for them to manage far), and to be able to get into the cellar without fear of the cornice hanging from the conservatory roof.  In short, I'm ready to get back to the wet but not nearly so beautiful weather that makes up the rest of a Scottish winter!

Saturday, 26 January 2013

Embracing the Camera

A way to ensure that every now and then I get in front of the camera instead of behind it, and there are a few pictures that actually have me in them, loving my children (or Hubby, but he tends to make faces at cameras!)


Thursday, 10 January 2013

Number Bean Bags

I saw this ages ago on Chez Beeper Bebe and stored the idea away (on a list, naturally) for future reference. I FINALLY got around to making them... I do get around to things on my list eventually you see!


 Here are the principles I used:

  • It had to be quick.  I have a pair of toddlers who require a lot of attention, I've loads of stuff that needs doing for Scouts, I've loads of crafty things to make on my list at the moment... you get the picture.
  • It had to cost next to nothing.  I don't like spending money that I don't need to spend, especially while not earning anything as a stay-at-home-mum.  Also, we've just had Christmas and it's a long stretch to January pay-day.
  • I wanted them to be tactile and pleasant to play with.
So I cut up an old ripped lilac sheet and an old black velvet skirt.  I vaguely used templates, but didn't cut them very carefully.
I cut out the numbers from the velvet.
I then approximately tacked the velvet numbers on to the sheet rectangles.  Chez Beeper's instructions involve some iron-on fusible web, but that I didn't want to spend the time waiting for it or the expense, so went for the tacking option.


Next was the tricky bit.  I've never used the applique option on my sewing machine.  I zig-zagged around the edge of each number.  Because there were so many twists and turns there was a bit of bunching.  I'm not sure, but I think perhaps the fusible webbing may have prevented this.  Also I'm not entirely sure about the green thread, I think it looks okay, but it does mean that my sewing deficiencies show up clearly.  I used it out of laziness.  It was the first thread to come to hand and I also already had this thread on the bobbin of the sewing machine.
Following this, I put the velvet and the numbers right-sides-together and stitched around three and a half sides of the rectangle.  I didn't pin them.  This meant that, again, there was some fabric bunching, and also some aren't quite rectangular.
I filled the bags with a mixture of chickpeas and lentils (which of course I had knocking about in my pantry), and then hand-stitched the last bit.

Of course, the children love them, and they are every bit as tactile and functional as I had hoped.  Not quite so aesthetically pleasing as those made by Chez Beeper Bebe though!

For the future, what would I recommend to do differently?
  • buy some nice fabric
  • cut the fabric more carefully
  • use the fusible iron-on bonding stuff
  • use a matching thread
  • pin the pieces together before sewing.
All in all, yet another project completed, and yet more lessons learnt.  You can't go wrong!

Monday, 7 January 2013

Slings and things...

Hello and Happy New Year!

I'm back and full of resolve for the coming year.  I WILL make some money through creative endeavours.  Even if it's only a little bit, enough to pay for a holiday.  It would be enough... to take some of the pressure off Hubby and to convince me that I can make "proper" money this way in the future when the little ones head off to school.

Now... before Christmas I tantalised and teased you by telling you that I was being creative, but not giving any further information because I didn't want to spoil the surprise for gift recipients.  Here are some of the things that I made:

First up, for a six-month-old baby nephew - I made a cross-stitch of his name and date of birth and framed it for his bedroom.  I haven't shown the finished item here as I don't want anybody stealing his identity!

For Bug, for her main present from Santa I spent many many many hours sewing this house.  I know, it doesn't look fantastic, but I practised all sorts of techniques in the making.  It's a Goldilocks and Three Bears house bag, complete with quilting and embroidery all over.
 The roof opens, and inside is a story book, three hand made felt bears with clothes, a little Goldilocks, a wooden spoon and a bowl of papier-mache porridge so that we can re-enact the story when we tell it.  I'm delighted and relieved to say that both she and C love it.


I also made three dolls slings and three hairbands, one each for my two nieces and for Bug.  
 I worked hard on the packaging and branding too - looking to how I might sell things in the future, and was delighted with how they looked in the end.
 
 Bug is still a bit small to wear the sling or hairband for long, but she was pretty pleased with them on Christmas morning.


Saturday, 22 December 2012

Child-led crafting

How often do you let your child lead the way with crafting?

I'm guessing that the older your child and the more comfortable you are with mess the more likely it is that you let them lead the way.  The younger they are and the more pristine you like to keep the nest, the less likely that they get free rein.

Up until now I've mostly led the way to some extent.  Either I've told them what we are making (such as with the snowmen and the Christmas tree decorations, or I've just decided on the equipment or media and let them get on with it, such as with our shell sculpture, or pipe cleaner people.

Sometimes C has asked for particular items, but up until now he's been a bit aimless, and just been sticking or cutting randomly.

This week was the first time that he's had a very particular end in mind, and has come asking for the bits and pieces he needed.  He had an interesting stick which he had found in the garden and brought into the house.  He left it to dry on the radiator for a couple of hours.  At the beginning of quiet time he requested "some sparkly things and some glue".  When I asked what for, he said he wanted to make a sparkly stick as a present for Santa.  I suggested that he might want something to stick the stick into so that it would stand up, so he also asked for some playdough and a little pot.  I provided the goodies and left him to it.  A little while later he reappeared and asked for a wet cloth so that he could wipe the glue off his fingers.

Here's the result:

Isn't it awesome?!  He came up with this all by himself, and he's only three and a half.  He is adamant that its a gift for Santa and that we need to take it with us to leave with the beer and mince pie that we leave out for the big man on Christmas Eve.  I just love him so much.  He makes me proud.

Thursday, 20 December 2012

Christmas Gifting

I'm having mixed feelings about my Christmas gifting.

Some of the gifts are, I feel, pretty good.  I'm quite proud of the ones that I've made, though they don't look much.  You'll get to see them after Christmas, when the recipients have seen them too - but I'm quite pleased.  One or two that I've bought have been pretty good too.

Others, unfortunately, are distinctly lacking in inspiration.  There are a few people for who it is difficult to buy.  I really want to get something  brilliant, personal, that they can see is well thought out and special to them.  I can't always succeed.  Either I hoped to make them something but never managed to fit it in, or I just didn't know what to do.  In any case, I know which people they were, so I'll start with them next year and concentrate to get something better.

Wednesday, 19 December 2012

Easy Toddler craft activities - salt dough Christmas tree decorations

Salt dough is a brilliant activity for toddlers.  It feels good, it is cheap, it washes off and you can do so much with it!

I've made things with salt dough in the past, but not for a long time and this is the first time I've done it with the children.  We made Christmas Tree Decorations, which we've painted with glitter paints and threaded with ribbon ready for the children to give as Christmas gifts to whoever they would like to.

Salt dough recipe:
Use half as much salt as flour and mix to a dough consistency with a little water at a time, usually about the same volume as salt.  I used one cup of flour, half a cup of salt and about half a cup of water and it made two baking trays full of decorations.

What to do:

  • Make the dough by mixing the ingredients (you can add food colouring and even glitter at the dough stage if you want).  Knead it well - the more you knead the smoother it will be.
  • Roll it out.
  • Cut with cookie cutters or just free-form if you prefer.  For Christmas tree decorations or anything else that needs hanging, don't forget to poke a hole through with a skewer at this stage.
  • Bake in the oven at 120 C until the dough has completely dried out.  I think I left it in for about two hours, but I'm not sure that this was enough, and now I have the finished items sitting on top of a radiator just to make sure they are completely dry.  Apparently you can also put them in the microwave for two or three minutes.
  • Once dried out, paint your creations.  You can use any type of paint - poster paint, acrylic, glitter glue.  You can also varnish with proper varnish or with PVA and water mixed 1:1.
  • Thread with ribbon.

Saturday, 15 December 2012

More Christmas activities for toddlers

Following our Advent activities to get ready for Christmas - we have:

made a wreath (this one was largely me, once they'd felt the holly prickles they suddenly weren't all that interested and wanted some CBeebies!)

decorated a potted mini Christmas tree (it wants re-potting really but was frozen into its pot so will wait until after Christmas).  Decorating it was C's job

decorated the Christmas cake  - now we can eat it!

watched The Snowman

been to The Ceramic Experience to paint some coasters for family Christmas gifts

put up the Christmas Tree

Please forgive my shocking lack of posts lately.  I'm full of cold that I just can't seem to shift so have no energy, and I'm frantically trying to finish some crafting projects required for Christmas presents.

Monday, 10 December 2012

Quick Christmas crafts for toddlers - angels and stars!

This is a glittery one, so beware!


What you need:
  • some doilys (white, silver or gold - all good)
  • some cardboard - empty cereal box is perfect
  • glue
  • glitter
  • pencil
  • string or thread
  • scissors
  • selotape
The Angel
  • take a doily, and imagining that it's a pizza, cut out 1/3.
  • Cut out a piece of cardboard that is the shape of a skittle (head on top and a fattish bit for the body).  Get your toddler to draw a face on the blank side of the cardboard.
  • Take the larger piece of doily and wrap it around so that it makes a good cone shape, cut off the pointiest bit.  Unwrap again and then rewrap with the neck of the cardboard in the point of the cone (look at the pictures for help deciphering what I mean here) and glue the dress in place.  
  • Now glue the smaller piece of doily onto the back as the angel's wings. 
  • Dab some glue on to the front of the angel's head and dip in glitter to make a halo.
  • When it's dry, use some selotape to attach a loop of thread to the back so that you can hang it from the tree.
The star
  • show your child how you use a ruler to draw straight lines.  Draw three longish lines all crossing in the middle, and then three smaller lines each going in between the three longer lines.  Now join up the ends of all these lines (again, look at the picture to get a clue what I'm on about).
  • Depending on the development of your child you can then get them to draw their own star, or not; and to cut out their star... or not.
  • Get your child to put glue wherever they want on the star.
  • Sprinkle glitter over the star (show your child how to do this inside a tray so that the surplus glitter can be collected back up and sprinkled again).
  • When all the glitter is dry, use tape to attach a loop of thread from the back so that you can hang it from the tree.
Enjoy!  Please share links to your favourite Christmas crafts for little ones, I'm always after some inspiration.

Thursday, 6 December 2012

Quick and easy crafty ideas for toddlers - cotton wool snowmen

I think that these are totally cute, and very easy to make.

First - take an empty cardboard box from the recycling and cut out a snowman shape.
Next - provide your toddler with glue and encourage them to liberally spread it all over the snowman shape.
Provide them with cotton wool balls and show them how to tease out the ball shapes to make "clouds", then get them to stick the cotton wool all over the snowman.
For the next stage it depends on the development of your child.  If they are happy to do it, then just provide them with some coloured paper scraps and encourage them to cut out appropriate pieces for hat, nose, eyes, buttons etc.  If they are still... well... anything like Bug, then you need to cut out the shapes and direct them exactly where to stick them on (she really wanted to stick the nose on to her own nose... and to stick everything else to the table!).
Et voila!  Gorgeous snowmen to decorate your home.